

How to Diagnose and Fix a Clogged RV Black Tank Vent: A 2025 Guide
Posted by Happy Campers Store on May 28th 2025
Clogged RV Black Tank Vent? Here's Your Complete 2025 Guide to Diagnosing and Fixing It
If you've noticed persistent sewer odors, slow-draining toilets, or gurgling sounds in your RV, a clogged black tank vent could be the culprit. This guide will help you understand the function of the black tank vent, recognize signs of blockage, and provide step-by-step instructions to assess and fix the issue.
Understanding the RV Black Tank Vent System
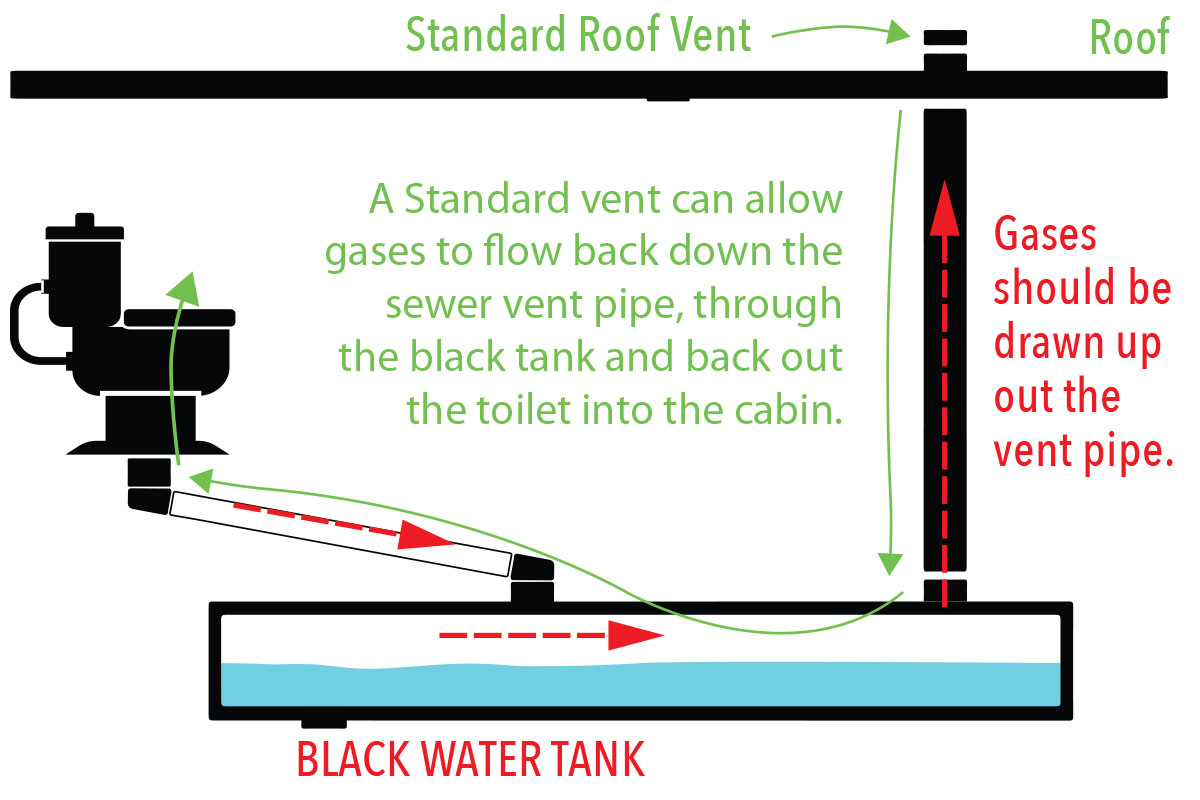
The black tank vent, also known as the vent stack, is a vertical pipe (typically 1½ inches in diameter) that extends from the top of your RV's black tank through the roof. Its primary function is to allow sewer gases to escape, maintaining proper air pressure within the tank and facilitating efficient waste flow. A blockage in this vent can disrupt this balance, leading to unpleasant odors and drainage issues.
⚠️ Signs of a Clogged Black Tank Vent
Be vigilant for these common indicators:
-
Persistent sewer odors: Especially near the bathroom, these often indicate a venting problem.
-
Slow drainage: Toilets or sinks may drain sluggishly due to air pressure imbalance.
-
Gurgling sounds: Noises during flushing suggest trapped air.
-
Toilet bowl water level fluctuations: May result from inconsistent air pressure caused by a blocked vent.
Inspect for a Leaking or Malfunctioning Valve
A leaking black tank valve could cause the tank to dry out prematurely, allowing odors to escape back into your RV.
- Tip: With gloves on, visually inspect the valve for leaks or drips.
- Fix: Replace the valve or use a valve seal lubricant if it's sticky or hard to close.
Recommended Product: Valterra Twist-On Waste Valve – attaches easily and provides a secondary shutoff for leak prevention.
Diagnosing a Clogged Vent
- Visual Inspection:
- Roof Access: Safely climb onto your RV's roof and locate the black tank vent pipe.
- Remove Vent Cap: Carefully take off the vent cap to inspect for visible obstructions like debris, nests, or insect infestations.
- Water Test:
- Pour Water: Using a hose or a container, pour water into the vent pipe.
- Observe Flow: If the water flows freely into the tank, the vent is clear. If it backs up or overflows, you likely have a clog.
- Check for Loose or Disconnected Pipes:
- Gently Wiggle the Pipe: Gently wiggle the vent pipe. Excessive movement could indicate it has come loose or detached from the black tank, which would require a more involved repair.
Clearing the Blockage
Method 1: Water Flush
- Attach a Hose: Insert a garden hose into the vent pipe.
- Flush the Vent: Turn on the water to flush out the blockage. Ensure the black tank valve is open to prevent pressure buildup.
- Cautionary Note: Ensure the black tank valve is open to prevent pressure buildup or overflow.
Method 2: Manual Removal
- Use a Flexible Rod or Snake: Gently insert a plumbing snake or a flexible rod into the vent pipe to dislodge the obstruction. Insert the snake carefully to avoid puncturing or damaging internal tank components.
Method 3: Professional Assistance
- Consult a Technician: If the blockage persists or you're uncomfortable performing these steps, seek professional help to prevent potential damage.
Consider Airflow and Wind Direction Effects
If you only notice odors while driving or when the wind picks up, outside air could be forced into the vent instead of pulling air out—especially if the vent is installed low on the roof or lacks directional protection. While driving or during high winds, external airflow can sometimes force odors back through the vent system, especially if your vent cap lacks aerodynamic features.
- Solution: Install a rotating vent cap that uses wind to draw air out rather than allowing it in.
Product: Camco Cyclone Sewer Vent – spins with wind to enhance upward airflow and odor removal.
Preventative Maintenance Tips
- Regular Cleaning: Periodically flush your black tank and vent system to prevent buildup.
- Use Tank Treatments: Products like Happy Campers Extreme Cleaner can help break down waste and maintain a clean system.
- Install Vent Covers: Protect your vent from debris and pests by installing appropriate covers.
- Educate Users: Ensure all RV users understand proper waste disposal and tank maintenance practices.
Tools & Products Checklist
| Item | Purpose | Where to Buy |
|---|---|---|
| Garden Hose | Water flush test | Amazon |
| Drain Snake / Auger | Break up physical blockages | DrainX Auger on Amazon |
| Valterra Twist-On Valve | Secondary shutoff for leaks | Amazon |
| Camco Cyclone Vent | Improves odor ventilation | Amazon |
| Happy Campers Extreme Cleaner | Breaks down stubborn waste buildup | Official Site |
Top Selections Explained:
-
Happy Campers RV Holding Tank Treatment: Odorless and effective, this treatment liquefies solids and eliminates the need for RV-specific toilet paper.
-
Polar White Vent Stack Shroud: Its aerodynamic design creates a vacuum while driving, preventing odors from re-entering your RV.
-
Heavy-Duty Plastic Vent Cover: Made from UV-stabilized plastic, this durable cover resists rust and cracking.
-
Duct Cleaning Brushes (3/8" NPT): Ideal for maintaining vent pipe cleanliness and preventing buildup.
-
Clear Vinyl Vent Line (5/16"x25’): Durable tubing for replacing or extending vent lines.
? Conclusion
A properly functioning black tank vent ensures a clean, odor-free, and comfortable RV experience. With regular inspection, cleaning, and the right tools, you’ll prevent most common issues and extend the life of your waste system.
For more tips and products to keep your RV in top shape, visit our Happy Campers Store.