RV Dump Station Etiquette: The Unspoken Rules, Common Disasters, and the Dump Kit Every RVer Should Carry
Posted by Happy Campers Store on Nov 14th 2025
RV Dump Station Etiquette: The Unspoken Rules, the Gross Mistakes, and the Science of Not Being That Camper
Published November 2025 • Happy Campers RV Education Series
Dump stations don’t have to be stressful—or disgusting. Well, a little disgusting, but this guide breaks down the unspoken rules of RV dump station etiquette, the rookie mistakes that lead to campground legends, and the exact dump kit you should carry to keep every visit fast, clean, and drama-free. Includes real examples, practical tips, and gear recommendations seasoned RVers swear by.
From forgotten hose caps to overconfident overconfident ‘eyeball-rinse’ types who stand way too close to the sewer connectors, the dump station can turn even seasoned travelers into temporary comedians. The truth is, good dump station etiquette isn’t just about manners — it’s about chemistry, safety, and keeping every traveler’s day a little less smelly.
In this guide, we’ll cover the unspoken rules, the common horror stories, the real science behind what’s happening when you pull that valve, and a simple kit of gear that makes the whole process faster and cleaner. Whether you’re a new RVer or a long-hauler who’s seen a few “brown geysers,” this post will help you dump cleanly, confidently, and without starring in someone else’s campfire story.
Before You Dump: Prep Like a Pro
Dump station success starts before you even reach the concrete pad. A little preparation saves time, frustration, and the chance of becoming “that person” everyone watches from behind their steering wheels.
Check Your Gear
- Inspect your hose for cracks or weak fittings — leaks never improve your reputation.
- Keep a dedicated pair of gloves and a small spray bottle of disinfectant ready.
- Store your black and gray valve caps where you can reach them fast (you’ll thank yourself later).
Position, Then Prep
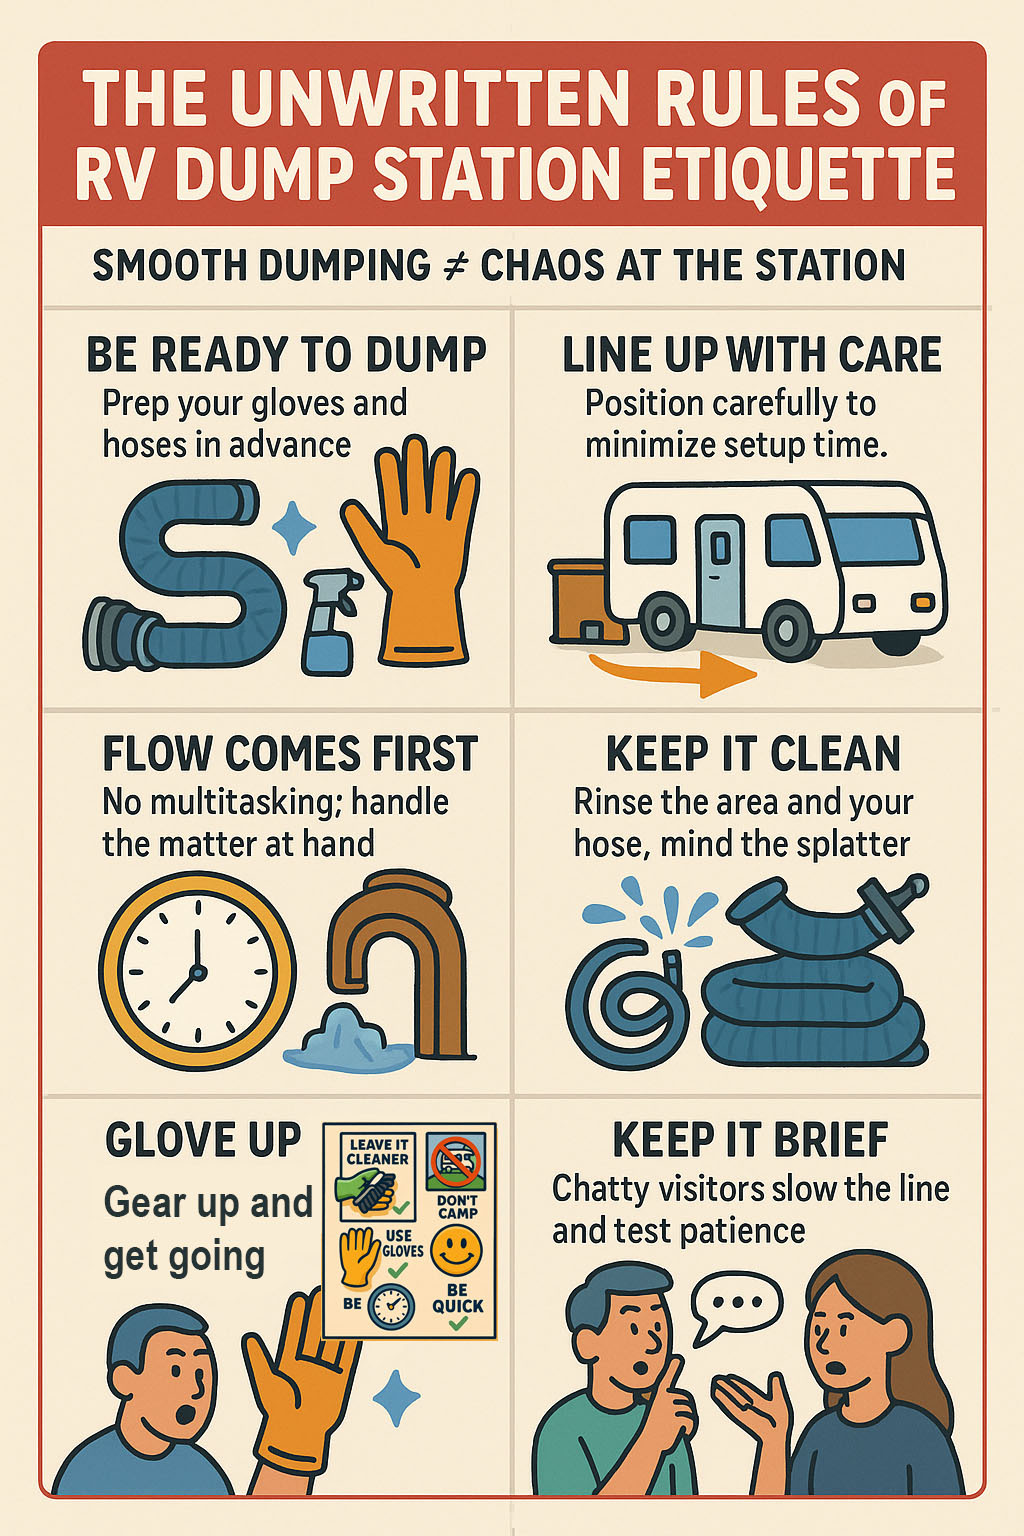
Don’t start unraveling hoses while you’re still crooked in the lane. Line up, stop, and make sure your outlet lines up with the station’s inlet. Every second you spend adjusting after connecting is another second of side-eye from the queue behind you.
When you’re set, chalk your wheels if needed, then pull out your hose and elbow. Keep the ends capped until you’re actually ready to attach — it’s the simplest way to avoid the dreaded “pre-dump drip.”

Know the Rules of the Station
Most dump stations have posted time limits, rinse instructions, or hose policies. A quick read before you start can prevent awkward moments (“Sir, that’s the potable water spigot…”). If you’re unsure, ask. Veteran RVers would rather answer a quick question than clean up your mystery puddle later.
Find approved dump stations near you if you’re not sure your next stop has one. Some regions limit access in winter or require a small fee or permit.
The Dump Station Flow Zone: How to Move Efficiently
Think of a dump station as a three-lane highway: setup, flow, and cleanup. Everyone gets a smoother trip when traffic keeps moving in order. If you’ve ever been stuck behind someone sanitizing their sewer hose while you hold a full black tank, you know what we mean.
Zone 1 – Setup
This is your prep area. Gloves on, hose connected, elbow locked. Make sure that hose is secured before pulling any valve — gravity has no mercy.
Zone 2 – Flow
Open the black tank first. Let it empty completely, then close it and open the gray tank. The gray water acts like a rinse cycle for your hose — less residue, less odor, and fewer judgmental looks from the next RVer.
If your rig has a built-in flush system, use it briefly — but don’t hog the line. If there’s a crowd, a quick rinse is courtesy; save the full spa treatment for later at home or a private site.
Zone 3 – Cleanup
Once your gray tank finishes, disconnect carefully and cap both ends before moving to rinse. Use the rinse hose (not the potable one!) to flush the dump station area. If there’s splatter, spray it — the golden rule is simple: leave it cleaner than you found it.
Pro tip: Carry a small trash bag for disposable gloves and wipes. Nothing ruins the mood faster than a glove tumble-weeding across the pad toward someone’s tire.
The Core Etiquette Rules (a.k.a. Don’t Be the Story)
If dump stations had security cameras, half of YouTube would be comedy gold. Etiquette keeps things flowing — literally and socially — and ensures nobody ends their trip with new trauma or a viral clip.
- Be ready when it’s your turn. Gloves, hose, adapters — all within arm’s reach before you pull up.
- Don’t multitask. Now isn’t the time to check messages or fill fresh tanks. You’re on the clock.
- Don’t rinse inside the station drain. Rinse your hose over your own opening or away from the inlet; the next user will appreciate it.
- Keep conversation short. You can talk sewer sensors later — others are waiting for that sweet relief of gravity. (swearing under your breath - totally acceptable).
Etiquette isn’t complicated — it’s just about being mindful that everyone in line has a full tank and a short fuse. Treat it like a pit stop, not a picnic.
Dump Station Horror Stories (and What to Learn from Them)
Every RVer has seen (or heard about) a dump-station disaster. The goal isn’t to laugh — well, maybe a little — but to make sure you’re never the main character.
- The “Surprise Shower.” Someone forgets to close the gray valve before pulling the cap. Cue the geyser. Always check valve positions twice before removing that cap.
- The “Forgotten Cap Fiasco.” Leaving without re-attaching your sewer cap turns your next drive into a smelly air-compressor experiment. Take ten seconds to double-check fittings.
- The “Mismatched Hose Mayhem.” Cheap bayonet fittings or mismatched threads pop loose mid-dump. Use a twist-lock elbow and keep one hand braced.
- The “Gray-Then-Black Rookie Mistake.” Dumping gray first defeats the purpose — it won’t rinse the hose. Always black first, gray second.
- The “Wind-Assisted Spray Paint.” A sudden gust plus an unweighted hose equals a Jackson Pollock moment. Keep the outlet end secure and low.
Moral of the story: a little patience at the dump station saves hours of cleanup — and your dignity.
The Science Behind the Smell
That unmistakable “dump station aroma” isn’t just unpleasant — it’s chemistry at work. When waste breaks down without enough oxygen, anaerobic bacteria produce hydrogen sulfide (the rotten-egg smell) and mercaptans (think skunk spray). Warm weather and trapped air accelerate this reaction, which is why you’ll sometimes smell a station before you see it. This explanation describes how odors form and are released during dumping, not how to chemically treat or alter waste.
Ventilation, proper rinse flow, and good tank habits help reduce gases before they reach the hose. If tanks sit with valves open, low water levels, or lots of residue, odors concentrate and rush out the moment you pull the valve — especially after driving when everything’s been sloshed around.
The good news: keeping plenty of water in your tanks, dumping when they’re at least two-thirds full, and rinsing regularly goes a long way toward reducing that “wall of smell” for you and everyone else waiting in line.
Dump Station Karma: The Golden Rules
- Leave it cleaner than you found it. A quick rinse of the concrete pad earns instant karma.
- Don’t camp at the station. Finish, rinse, and pull forward to let the next RVer through.
- Keep conversations PG-13. Not everyone needs a play-by-play of what’s in your tank.
- Use gloves — and dispose properly. Don’t leave used gloves on the post. Gross.
- Smile at the next person in line. We’ve all been there; the dump station unites us all.
Think of it as the unspoken social contract of the open road: treat the dump station with respect, and it will (mostly) respect you back.
RV Dump Station Essentials Kit (Real-World Gear That Makes Life Easier)
Most dump-station disasters don’t happen because people are careless — they happen because people are unprepared. A solid kit turns a stressful, smelly chore into a clean 90-second routine. Here are some widely used, well-reviewed products (with manufacturer links) that cover the basics. Prices are approximate and may change, so always confirm current pricing.
✔️ Camco RhinoFLEX 20' Sewer Hose Kit
A heavy-duty 20-foot hose kit with swivel fittings and a clear elbow so you can see when the tank is actually empty. Built to handle repeated use without kinking or cracking.
Approx. price: around $75–$80 (Camco list price currently about $79.99).
View Camco RhinoFLEX 20' Sewer Hose Kit on CamcoOutdoors.com
✔️ Camco Rhino Elbow & 4-in-1 Adapter
A clear elbow with a 4-in-1 adapter that fits multiple dump-station inlet sizes. The clear section gives you visual confirmation of flow and helps you avoid over-rinsing or disconnecting too early.
Approx. price: around $15–$20 (Camco currently lists this at about $16.99).
✔️ Camco Rhino RV Sewer Adapter PRO
A flexible, odor-tight adapter that expands to fit common 3½" and 4" inlets. Designed to create a more secure, leak-resistant seal at the dump station — especially helpful at older or worn-out connections.
Approx. price: around $40 (Camco currently lists this at about $39.99).
✔️ Valterra EZ Coupler 20' Sewer Hose Kit
A solid alternative hose kit with two 10-foot sections and a 90° bayonet fitting. Good choice if you prefer Valterra hardware or want a backup kit in addition to your primary hose.
Approx. price: often in the $35–$55 range depending on retailer.
✔️ Valterra RV Dump Gloves – Bag of 12
Simple, disposable gloves made specifically for RV plumbing tasks. One-size-fits-most and easy to keep in your wet bay so you’re never tempted to “just do it bare-handed this once.”
Approx. price: around $4–$9 depending on the retailer.
View Valterra RV Dump Gloves on Woodland Airstream (Valterra-branded)
✔️ Helpful Extras
- Small disinfectant spray for handles, fittings and your hands after glove removal.
- Knee pad or small mat so you’re not kneeling on cracked, wet concrete.
- 1–2 gallon jug of water (non-potable) for quick rinses when the station hose is missing or weak.
These don’t need to be fancy — just dedicated to dump-station duty so they’re always where you need them.
With a kit like this, you’ll look like you’ve been dumping tanks your entire life — even if your first dump-station experience still haunts your dreams.
FAQ: Common Dump Station Questions
Can I use dish soap or bleach at the dump station?
It’s not a good idea. Harsh household cleaners, bleach, and degreasers can be hard on septic and municipal systems. Stick with RV-safe treatments and plenty of fresh water to move waste along.
How often should I dump my tanks?
A good rule of thumb is to dump when your black tank is about two-thirds full. This gives you enough liquid weight and momentum to carry solids out of the tank instead of leaving them behind.
Should I leave my gray valve open at full hookups?
It’s better to keep the gray valve closed and dump periodically. Letting it trickle constantly can leave residue in your lines and dry out seals. A good surge of gray water helps flush things out.
Where should I dump after using a holding-tank cleaner?
Always use an approved municipal or high-capacity RV dump station — never a small home septic system. Those facilities are built to dilute and treat tank cleaners properly.
Written by the RV tank care experts at Happy Campers — helping RVers dump smarter, cleaner, and with fewer horror stories since 1999.


