

RV Electrical System Problems: How to Diagnose, Fix, and Prevent Common Failures
Posted by Happy Campers Store on Dec 29th 2025
RV Electrical System Problems: How to Diagnose, Fix, and Prevent Common Failures
A complete, step-by-step RV electrical troubleshooting guide — designed to help you identify problems fast, fix what’s safe, and know when to stop.
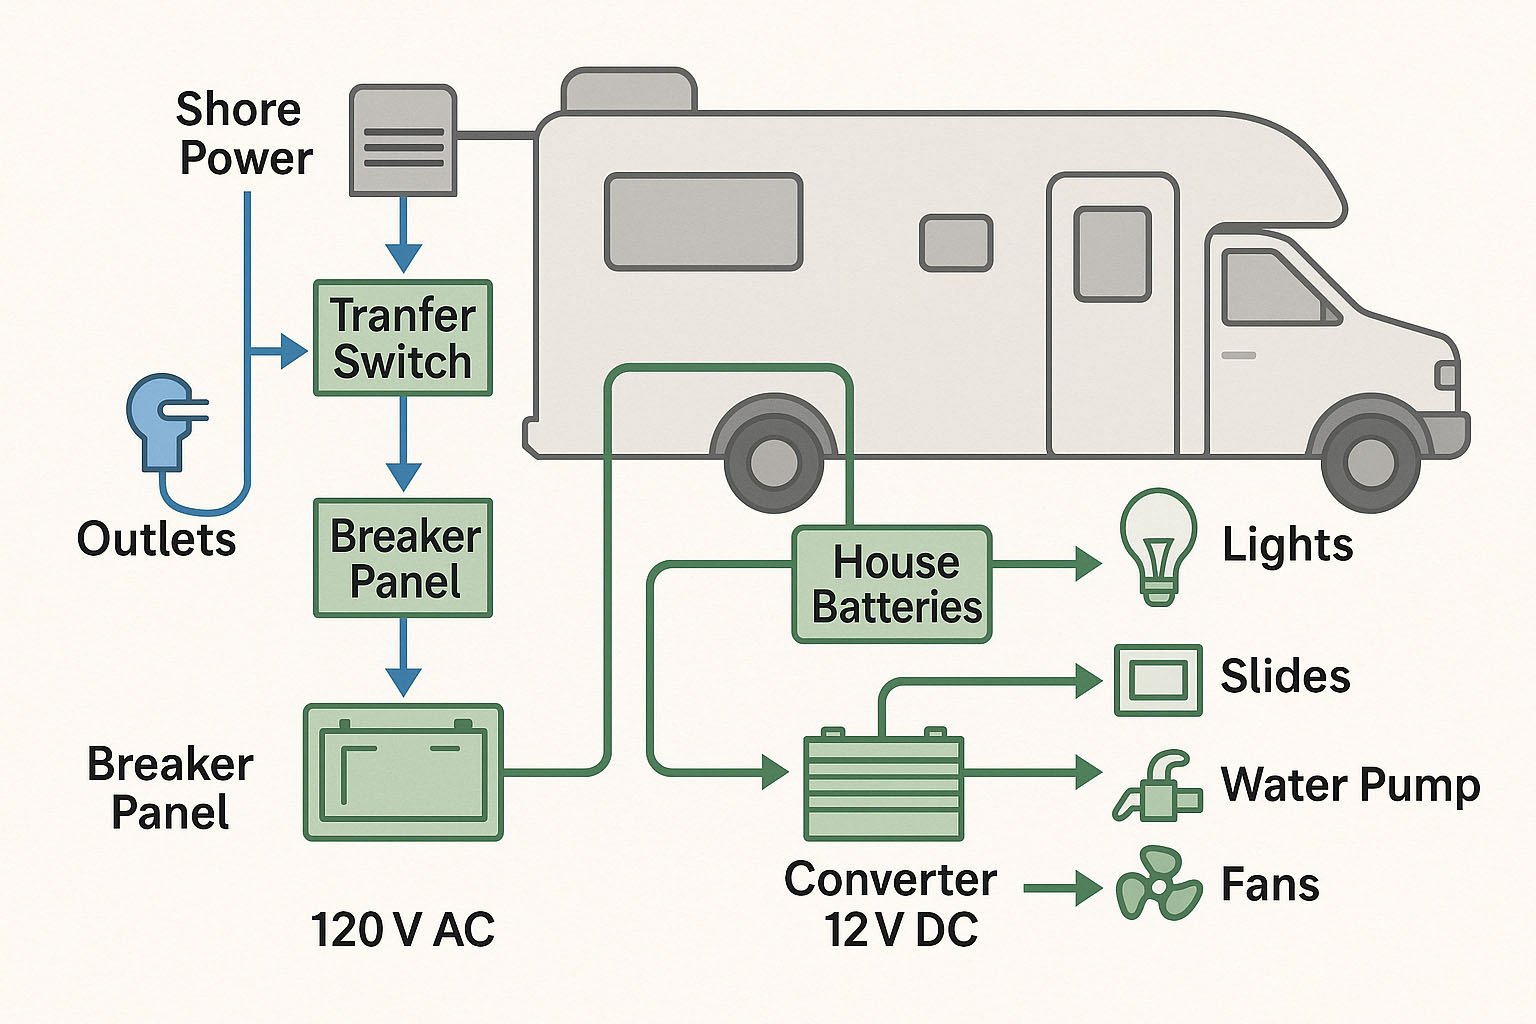
RV electrical problems are confusing because RVs don’t have one electrical system — they have two. A household-style 120-volt AC system powers outlets, air conditioners, and microwaves, while a 12-volt DC system runs lights, slides, fans, control boards, and water pumps.
Most RV electrical failures don’t happen gradually — they happen when you’re plugged in at a campground, miles from help, and something suddenly stops working.
Most misdiagnoses happen because people start replacing parts before answering one critical question: Is this a 12V problem or a 120V problem?
- Lights work but outlets don’t → 120V system
- Outlets work on generator but not shore power → pedestal, EMS, or transfer switch
- Lights dim, slides slow → 12V batteries or converter
- Breaker trips under load → overload or low voltage
Step 1: Is This a 12V or 120V Problem?
Before touching breakers or batteries, identify the system involved. This alone prevents wasted time and unnecessary part replacements.
- Outlets are dead but lights still work
- Microwave or TV won’t power on
- A/C trips breakers
- Lights flicker or dim
- Slides or jacks move slowly
- Water pump sounds weak
RV Has Power but Nothing Works
This is one of the most common and frustrating RV electrical problems. You’re plugged in, the display may show power, but outlets won’t work. In most cases, the issue is not catastrophic — it’s protective.
RVs commonly use daisy-chained GFCI outlets. One tripped GFCI (often in the bathroom or exterior bay) can disable multiple downstream outlets.
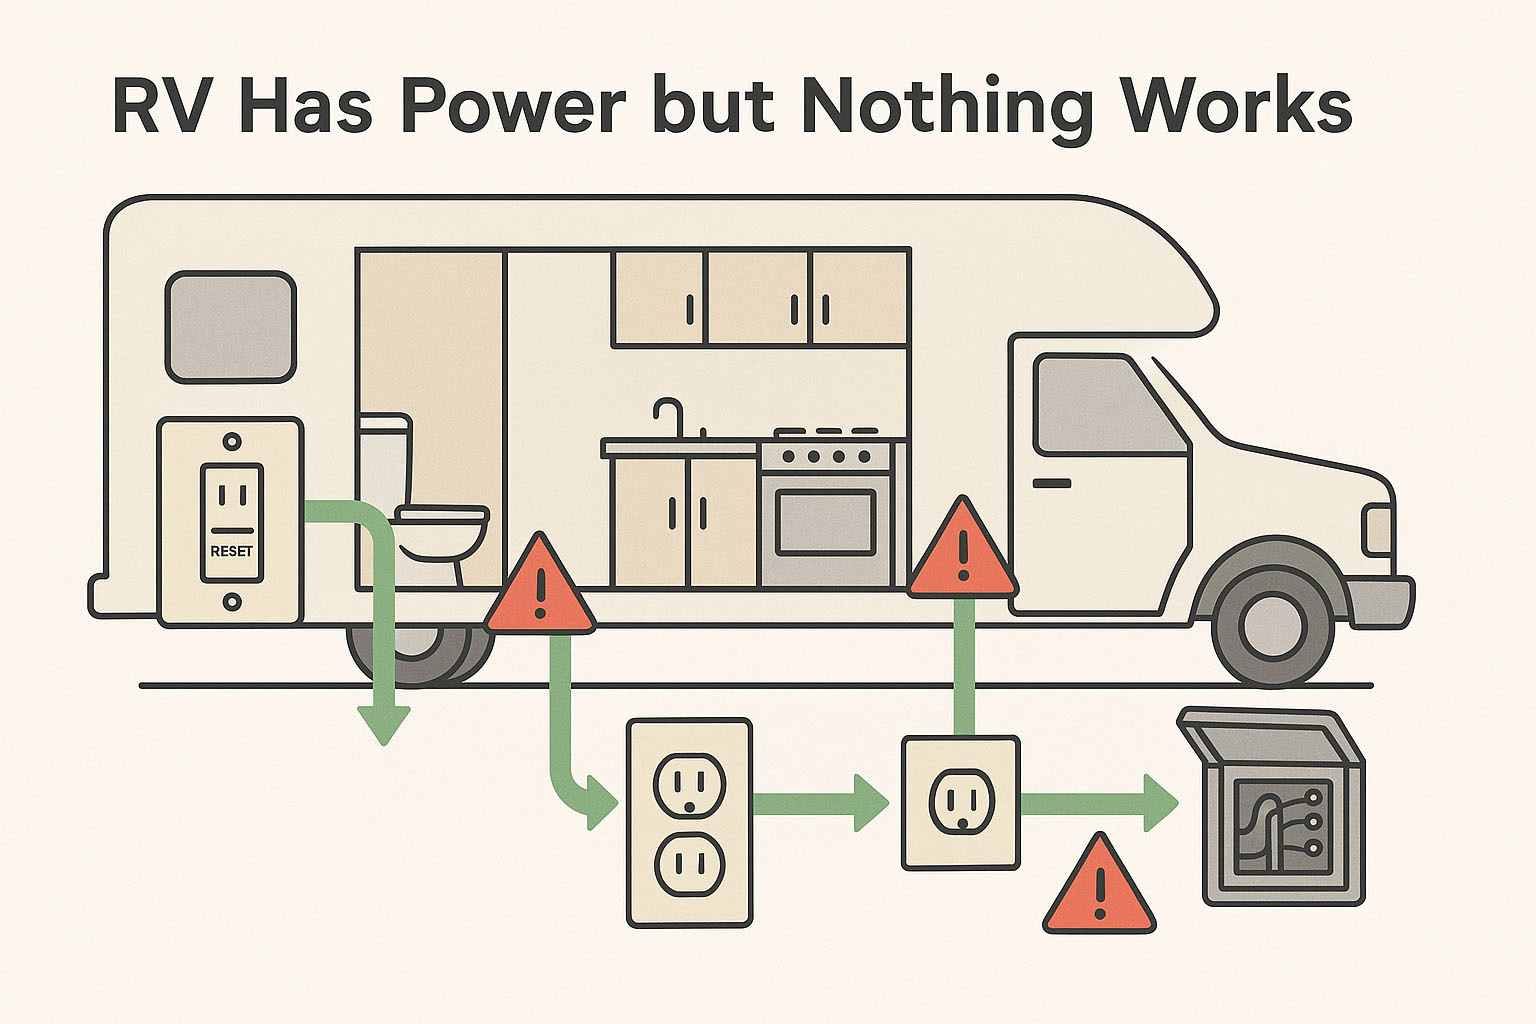
- Reset every GFCI outlet (bathroom, kitchen, exterior, basement)
- Turn suspect breakers fully OFF, then ON
- Test outlets with a tester or lamp
- If generator works but shore power doesn’t, suspect pedestal, EMS, or transfer switch
A common mistake is replacing outlets or breakers before checking a single GFCI. Always start there.
Why RV Breakers Keep Tripping
Breaker trips are usually caused by either overload or low voltage, not a bad breaker.
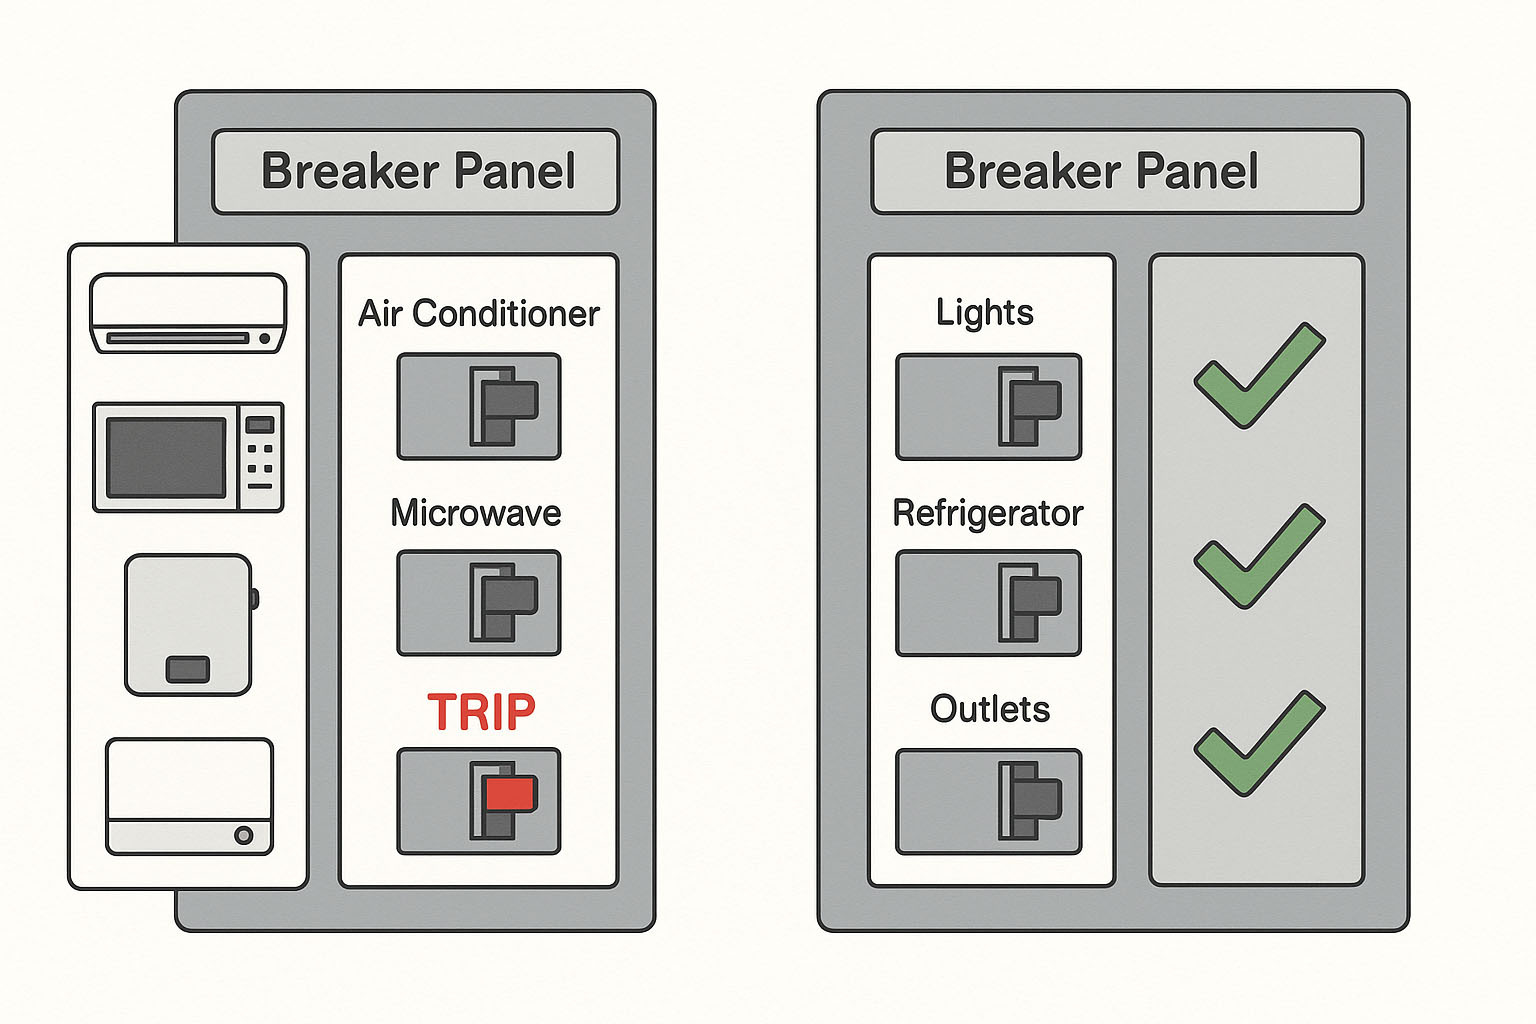
30-Amp vs 50-Amp RVs
A 30-amp RV has about 3,600 watts total available. A single air conditioner can use half of that. A 50-amp RV can supply up to 12,000 watts, which is why breaker issues are far more common in 30-amp rigs.
If breakers trip only at certain campgrounds, suspect weak or poorly wired pedestals.
Electrical faults that bypass breakers — such as grounding failures — can be even more dangerous than overloads.
- Replacing batteries when the converter is actually failed
- Replacing breakers when pedestal voltage is low
- Assuming an inverter charges batteries (it does not)
Common RV Electrical Repairs & Typical Costs
| Repair | Typical Cost | Notes |
|---|---|---|
| Converter replacement | $400–$900 | Parts + 2–4 hours labor |
| House battery replacement | $300–$900 | Battery type matters |
| Slide-out motor or gear repair | $450–$1,500 | Access & system design |
| GFCI / outlet repair | $120–$350 | Usually quick unless rewiring |
| Shore power plug / cord repair | $180–$500 | Low voltage damage |
RV Battery Not Charging on Shore Power
When plugged in, the converter should power 12V loads and recharge the batteries. If battery voltage stays low, charging is not happening.
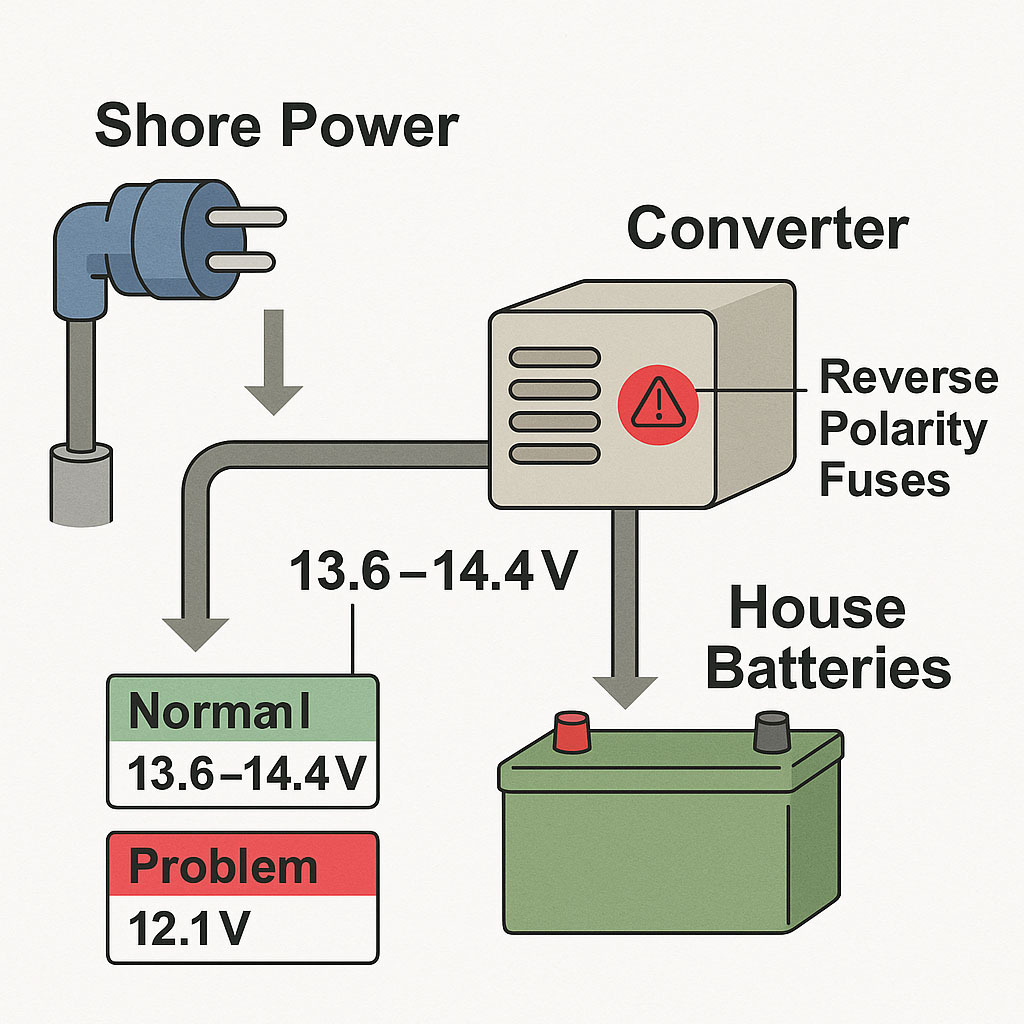
Healthy charging voltage is typically 13.6–14.4V. If batteries remain near 12.1–12.4V while plugged in, suspect the converter or its fuses.
How RV Battery Charging Problems Are Usually Fixed
If your RV batteries are not charging while plugged into shore power, the most common repair is replacing the converter. Converters fail from heat, vibration, and poor power quality over time.
- DIY: Possible for experienced RV owners comfortable working around 120V wiring
- Professional repair: Recommended if wiring access is tight or poorly labeled
Typical repair cost: $400–$900 (parts + 2–4 hours labor)
Read the full RV converter replacement guide (coming soon)→
Inverter vs Converter: Clearing the Confusion
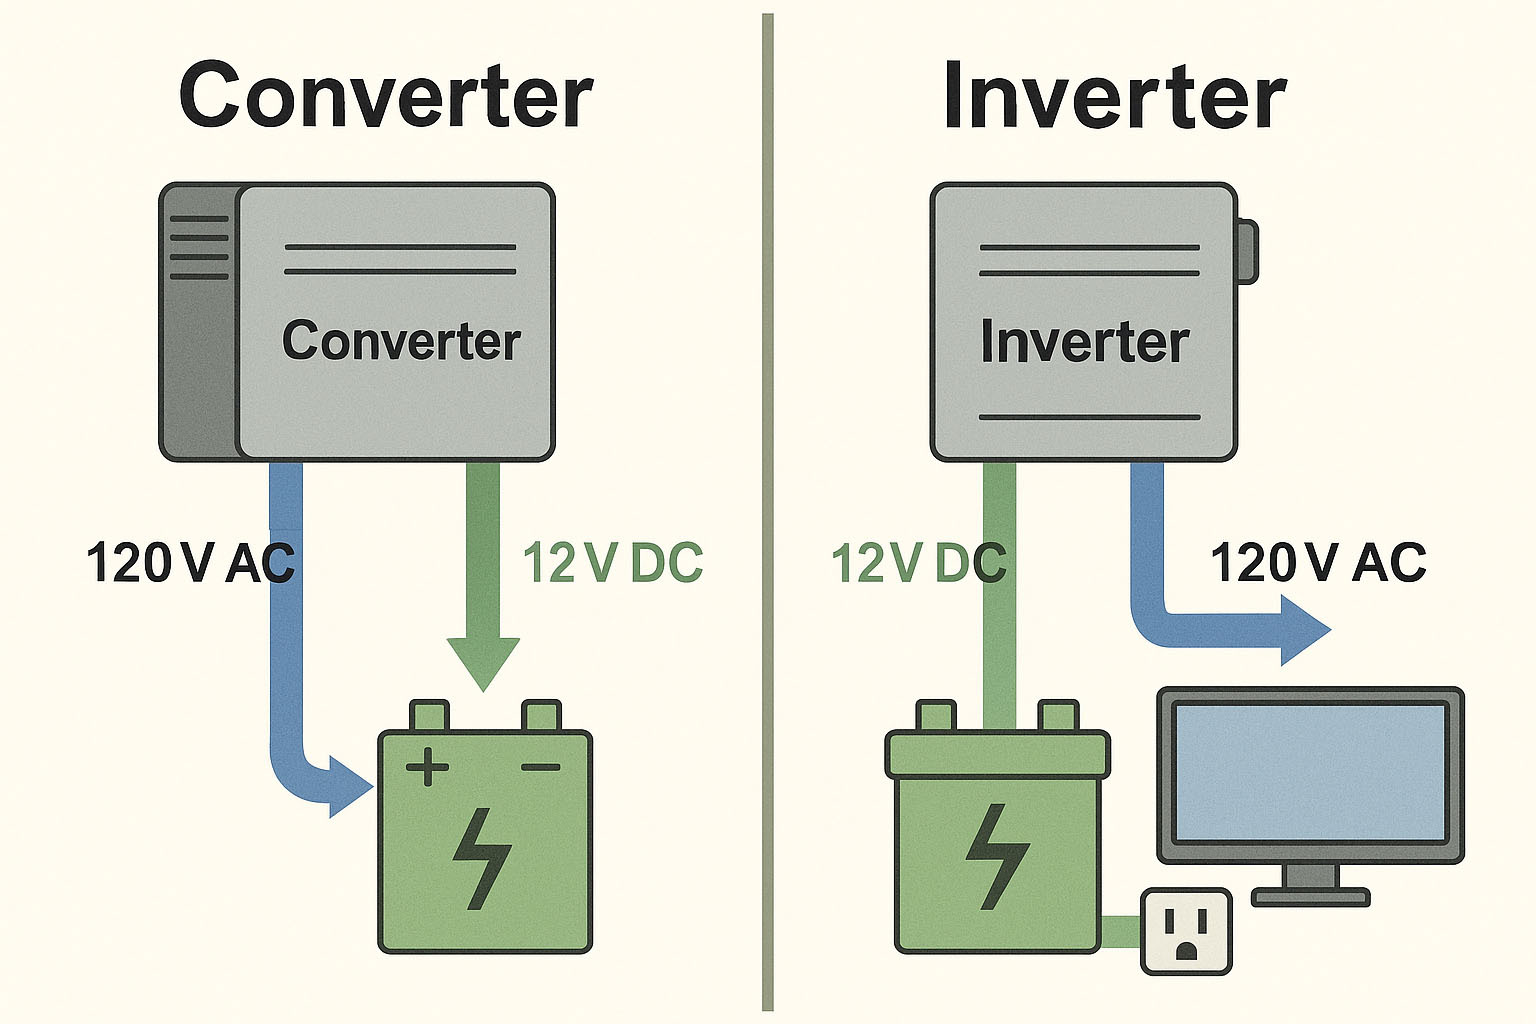
Converters charge batteries. Inverters use batteries to power outlets. Inverters shutting down usually indicate low battery voltage under load.
Replacing RV House Batteries
Weak or aging batteries cause dim lights, inverter shutdowns, and slow slides. Battery replacement is one of the most common and approachable RV electrical repairs.
- DIY: Very common and achievable for most RV owners
- Professional help: Useful for lithium upgrades or tight compartments
Typical cost: $300–$900 depending on battery type (flooded, AGM, or LiFePO₄)
RV Battery Replacement Guide (6V vs 12V vs Lithium) (coming soon)→
Slide-Outs Moving Slowly or Not Working
Slide-outs rely heavily on the RV’s 12V electrical system. When slides move slowly, stop mid-travel, or fail completely, the problem is often electrical before it is mechanical.
Low battery voltage, weak connections, or voltage drop under load can prevent slide motors from operating correctly. This is why slide problems frequently appear alongside dim lights or inverter shutdowns.
- Slides move slowly → weak batteries or voltage drop
- Slides stop mid-travel → low voltage under load
- No movement at all → blown fuse, failed motor, or control issue
How Slide-Out Electrical Problems Are Usually Fixed
Electrical slide issues are usually addressed by restoring proper voltage first. If electrical checks pass, mechanical components may need professional service.
- DIY: Battery testing, fuse checks, connection cleaning
- Professional repair: Motor, gearbox, or rail system repairs
Typical repair cost: $450–$1,500 depending on motor, gearbox, and access
RV Slide-Out Not Working: Electrical vs Mechanical Diagnosis (coming soon)→
Generator Runs but There’s No Power
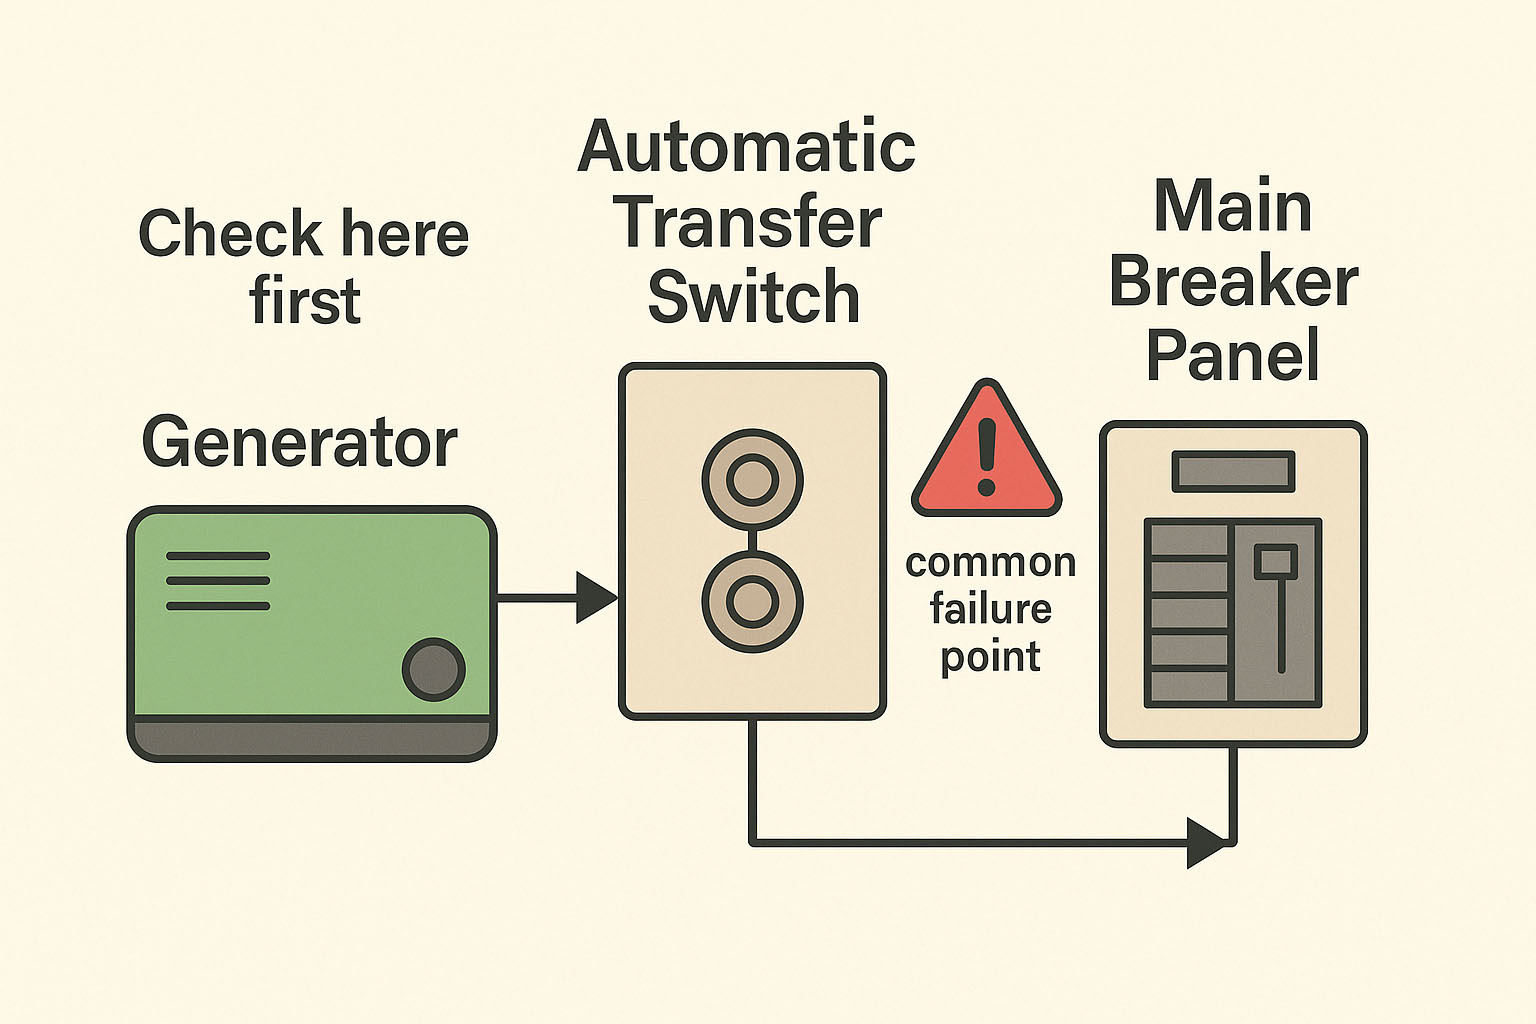
Always check the generator’s onboard breaker first. If generator power doesn’t reach the RV, the automatic transfer switch (ATS) is a common failure point, especially in rigs that switch automatically between shore and generator power.
Fixing RV GFCI and Outlet Problems
Most outlet failures are caused by a tripped or failed GFCI outlet. Replacement is usually straightforward, but wiring mistakes can create serious safety hazards.
- DIY: Possible if wiring is clearly labeled and power is fully disconnected
- Professional repair: Recommended if rewiring is required
Typical repair cost: $120–$350 (usually 1–2 hours labor)
How to Replace an RV GFCI Outlet Safely (coming soon)→
Burned Shore Power Plugs & Cord Damage
Burned shore power plugs are a very common RV electrical failure and are usually caused by low voltage, loose campground pedestal connections, or worn plug blades.
Heat buildup at the plug creates resistance, which leads to melted plastic, scorched connectors, and eventually loss of power.
- Hot plug or cord end
- Discoloration or melted plastic
- Intermittent power loss on shore power
How Shore Power Plug Problems Are Fixed
- DIY: Plug replacement if wire insulation is intact
- Professional repair: Required if cord insulation is heat-damaged
Typical repair cost: $180–$500
RV Shore Power Plug Burned? Causes & Fixes (coming soon)→
Electrical Safety: When NOT to DIY
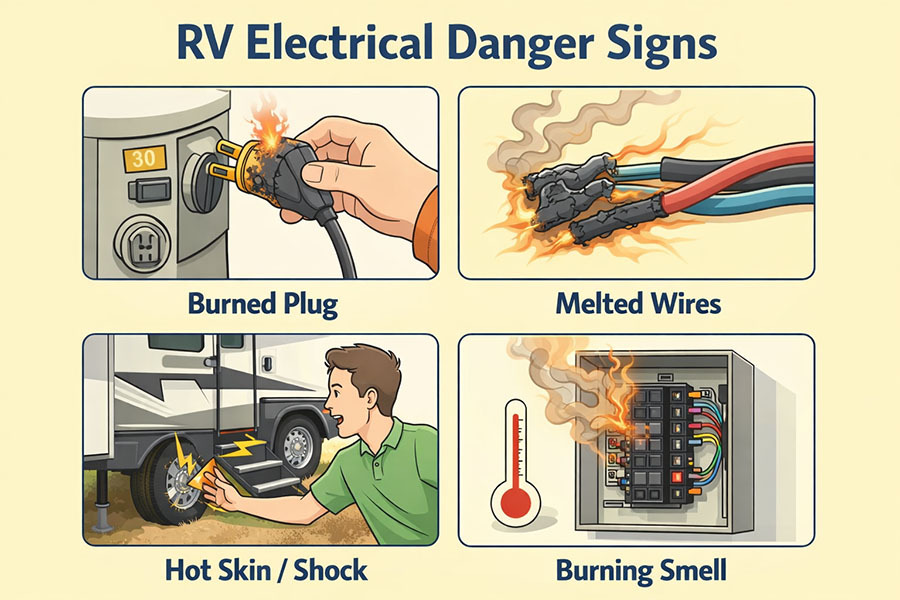
Loose connections, heat damage, and arcing are leading causes of RV electrical fires. Another serious — and often overlooked — danger is RV hot skin, where electrical current energizes the RV’s metal frame due to grounding faults.
Hot skin can cause shocks when touching the RV steps, hitch, or exterior metal and is most commonly linked to miswired pedestals, failed grounding, or damaged shore power cords.
If you suspect grounding issues or experience tingling shocks, stop immediately and read: RV Hot Skin: The Hidden Electrical Danger That Can Shock You Through Your RV’s Frame →
Do not attempt to diagnose hot skin issues without proper test equipment and a known-good ground source.