

How to Clean RV Holding Tanks: The Complete RV Black Tank Cleaning Guide
Posted by Happy Campers Store on May 14th 2026
The Happy Campers Holding Tank Cleaning System
How to Clean RV Holding Tanks: The Complete RV Black Tank Cleaning Guide
Deep clean black tanks, gray tanks, restore sensors, and remove buildup the right way.
Rinsing, flushing, backflushing, ice cubes, and dish soap can help move loose debris — but they are not the same as true holding tank deep cleaning.
What Is a True RV Holding Tank Deep Cleaning?
A true RV holding tank deep cleaning is not simply rinsing the tank until the water runs clear. Rinsing, flushing, backflushing, dish soap, and ice may help move loose debris, but they do not always remove buildup attached to tank walls, sensors, drain lines, corners, and outlet areas.
True deep cleaning means loosening and removing the residue, sludge, grease film, hardened waste, soap scum, scale, and sensor contamination that ordinary dumping and rinsing can leave behind.
How Do You Clean an RV Black Tank?
The same basic process applies to both RV black tanks and RV gray tanks: dump the tank, add cleaner and water, allow agitation and soak time, rinse thoroughly, and return to routine maintenance once the tank is clean.
- Dump and empty the tank.
- Add cleaner and plenty of water.
- Drive or agitate the tank.
- Allow adequate soak time.
- Dump and rinse thoroughly.
- Repeat if buildup remains.
- Return to routine maintenance.
How to Clean RV Holding Tanks the Right Way
Start With an Empty Tank
Completely dump and drain the holding tank before starting. A cleaner works best when it can directly contact buildup on the tank walls, floor, sensors, and outlet areas instead of being diluted by a full tank.
Add Cleaner + Plenty of Warm Water
Add Extreme Cleaner along with enough warm water to fill the tank approximately 1/3 to 1/2 full. The added water is important because it helps the cleaner reach tank walls, corners, sensors, and hardened buildup areas during agitation.
Drive to Agitate the Tank
One of the most important cleaning steps is allowing the cleaner and water to slosh throughout the tank while driving. Driving helps the cleaner contact buildup on all interior surfaces and break loose sludge, film, grease, residue, and compacted waste.
For best results, many RV owners add cleaner before leaving for their next destination, drive for approximately 45 minutes or longer, then dump and rinse the tank upon arrival.
Allow Proper Soak Time
Let the cleaner continue soaking long enough to penetrate sludge, grease film, hardened residue, mineral deposits, compacted waste, and sensor contamination. Older tanks with heavy buildup may benefit from longer soak periods and multiple cleaning cycles.
Rinse the Tank Thoroughly
This step is critical. The cleaner helps loosen buildup — but rinsing is what actually removes it from the tank.
After dumping, thoroughly rinse and flush the holding tank to help remove suspended debris, loosened sludge, film residue, and remaining cleaner solution. Incomplete rinsing may leave loosened contamination behind.
Tank backflushing can be extremely helpful during this step because it helps carry loosened debris out of the tank more effectively.
Maintain Tank Performance Going Forward
Once the tank is truly clean, ongoing maintenance helps prevent odors, buildup, sensor fouling, and flow restrictions from returning. Proper maintenance treatments work best when they are maintaining a clean tank — not trying to restore a dirty one.
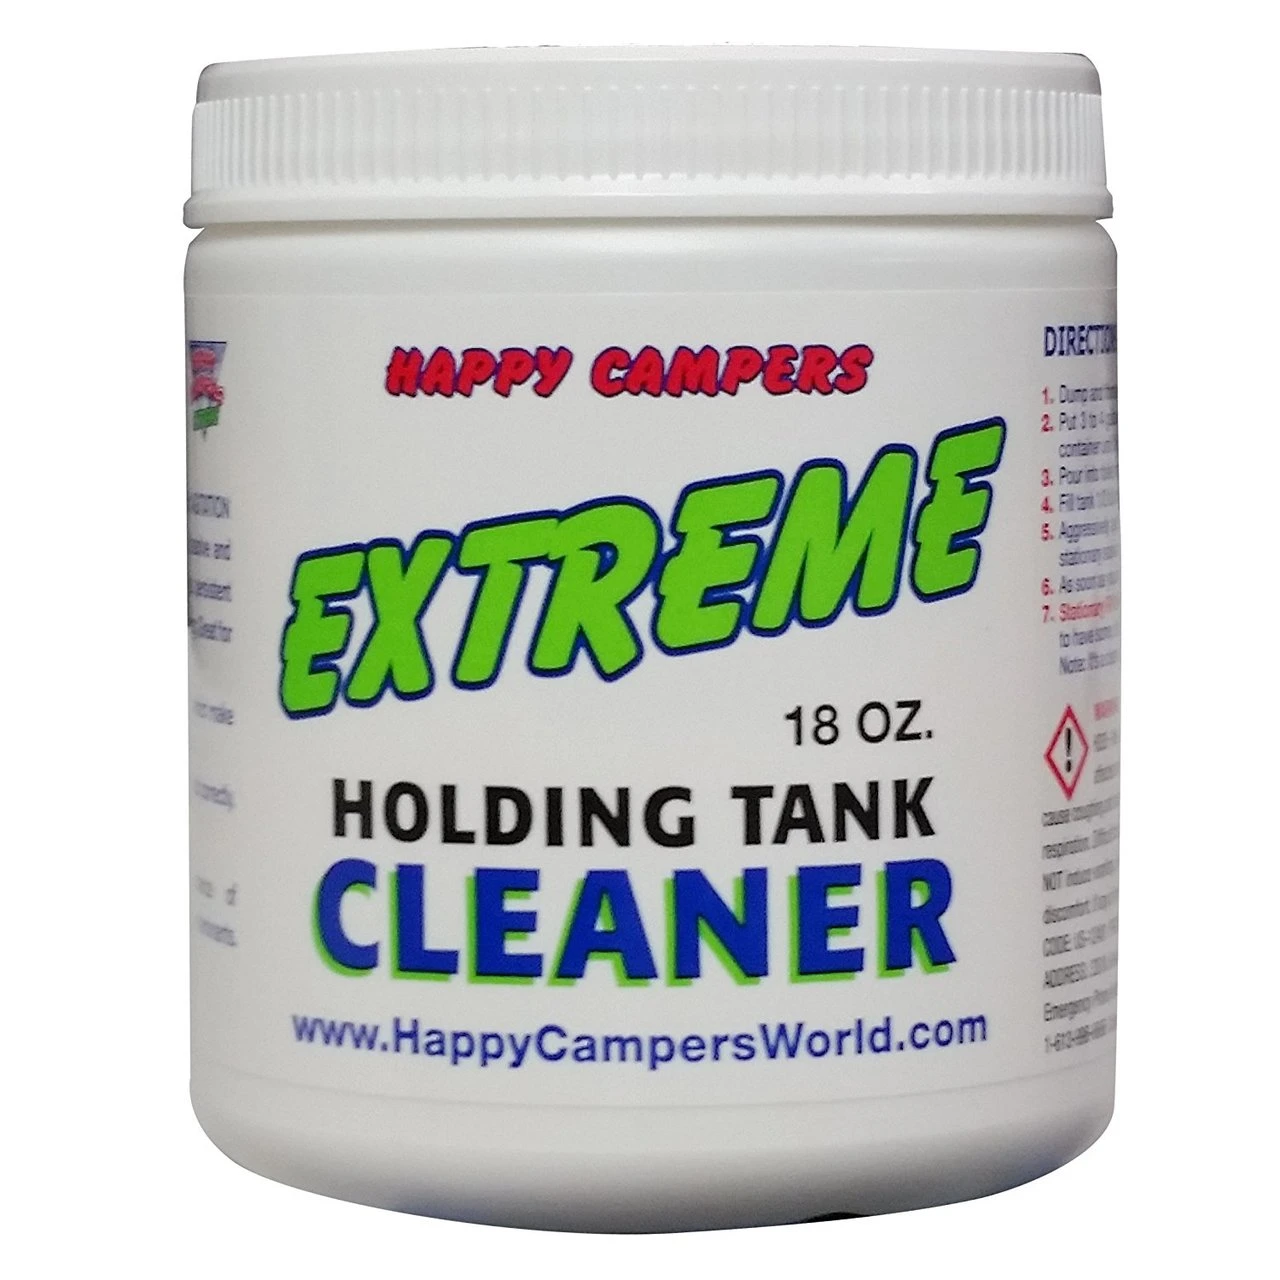
Use the Right Cleaner for Corrective Deep Cleaning
Extreme Cleaner is formulated to help loosen hidden sludge, grease film, residue, hardened waste, and buildup that ordinary rinsing leaves behind.
Signs Your RV Holding Tanks Need Cleaning
If any of these sound familiar, your holding tank may not actually be clean — even if the rinse water looks clear.
Why Rinsing Holding Tanks Isn't Enough
Dumping removes loose waste. Rinsing moves suspended debris. But hidden buildup can stay attached to tank walls, outlet areas, corners, and sensor probes.
That leftover buildup can trap odors, restrict waste flow, cause recurring clogs, and create false sensor readings.
A holding tank can appear clean while hidden layers of residue, sludge, grease film, and buildup remain inside.
Rinsing vs Cleaning vs Deep Cleaning RV Holding Tanks
Many RV owners use the terms dumping, rinsing, flushing, and deep cleaning interchangeably, but they describe very different levels of cleaning.
Understanding the difference can help explain why odors, sensor problems, buildup, and recurring issues sometimes persist despite regular maintenance efforts.
Dumping
- ✓ Removes loose waste
- ✕ Removes attached film
- ✕ Helps restore sensors
Empties the tank but does not clean residue left behind on tank surfaces.
Rinsing
- ✓ Removes loose waste
- ◐ Limited film removal
- ◐ Limited sensor improvement
Helps flush suspended debris, but hidden buildup may remain attached to walls and sensors.
Backflushing
- ✓ Removes loose waste
- ◐ Limited buildup removal
- ◐ Sometimes improves sensors
Useful for improving flow and clearing soft clogs, but not always enough to remove deeper contamination.
Deep Cleaning
- ✓ Removes loose waste
- ✓ Helps remove attached buildup
- ✓ Often improves dirty sensors
Targets sludge, grease film, residue, sensor fouling, and buildup that ordinary rinsing may leave behind.
What RV Owners Told Us About Cleaning RV Holding Tanks
As part of the Happy Campers RV Holding Tank Research Project, we asked RV owners what problems they experienced and what ultimately helped solve them.
One theme appeared repeatedly: RV owners described many different approaches to tank maintenance, and some continued experiencing recurring problems despite dumping, rinsing, flushing, or other routine cleaning efforts.
Problems That Often Persisted
- Tank sensors reading incorrectly after dumping
- Odors returning shortly after rinsing
- Gray tank smells that kept coming back
- Slow drainage despite repeated flushing
- Recurring buildup and clogs
What Owners Tried
- Tank rinsers and flush systems
- Backflushing
- Driving with water in the tank
- Homemade cleaning mixtures
- Multiple cleaning cycles
- Professional cleaning services
Research Snapshot
Preliminary responses from RV owners suggest that recurring tank problems remain common, even among owners who regularly maintain and rinse their tanks.
- 46 owners reported inaccurate tank sensors
- 32 owners reported tank odors
- 12 owners reported gray tank odors
- Only 3 of 61 respondents had ever professionally cleaned their tanks
- 53 of 104 respondents currently rely on tank treatments for maintenance
- 31 respondents regularly use tank rinsers
- 20 respondents reported backflushing as part of their routine
What this suggests: RV owners use many different approaches to "tank maintenance," and not all maintenance routines are equally effective at preventing long-term problems.
Some respondents reported using tank treatments as part of an ongoing maintenance routine, while others relied primarily on rinsing, backflushing, flush systems, homemade cleaning methods, or simply addressing issues only after symptoms appeared.
Rinsing and backflushing can help remove loose debris and improve flow, but they do not always remove the hidden buildup, grease film, sensor contamination, and residue that can gradually accumulate over time.
Maintenance treatments are designed to help support a clean tank environment and prevent new buildup from developing. However, if a tank already contains years of accumulated residue or existing contamination, a corrective deep cleaning may be needed first before routine maintenance can perform as intended.
What RV Owners Said
"Sensors read incorrectly. Still haven't solved it."
"A back flush was done several times and the black tank sensor cleared for a short time."
"Black tank sensor reads incorrectly after I empty it. The sensor clears and works well after flushing..."
"Used a tank cleaner and worked but stopped working again."
"Tried treatments, ultimately had to clean tanks to remove buildup."
"Sensors were reading incorrectly. I believe driving it with water in the tank solved the problem."
RV owners often use the same word—maintenance—to describe very different practices.
Dumping, rinsing, and backflushing are valuable parts of tank care, but by themselves they may not provide the same level of prevention as a complete maintenance system designed to support a clean tank environment over time.
The most effective approach combines:
- Proper dumping habits
- Adequate water use
- Routine maintenance treatment
- Periodic corrective deep cleaning when symptoms indicate buildup has already developed
An empty RV holding tank isn't always a clean RV holding tank—and maintaining a clean tank is often easier than restoring a neglected one.
Data shown reflects preliminary responses collected through the ongoing Happy Campers RV Holding Tank Research Project and may continue to evolve as additional RV owner experiences are submitted.
How to Clean RV Gray Tanks
Many RV owners assume gray tanks stay cleaner because they do not contain toilet waste. In reality, gray tanks commonly develop heavy layers of grease film, soap residue, food particles, body oils, detergent buildup, and biofilm.
Unlike black tanks, gray tank buildup is often hidden because it forms in thin layers along tank walls, drain plumbing, P-traps, and outlet areas instead of obvious solid waste accumulation.
Common Gray Tank Problems
- Kitchen sink odors
- Shower drain smells
- Grease and soap buildup
- Slow draining sinks
- Recurring sour or musty smells
- Odor returning quickly after dumping
What Causes Gray Tank Odor?
- Grease coating tank walls
- Soap scum and detergent film
- Food residue trapped in plumbing
- Biofilm growing inside drain lines
- Mineral scale trapping organic residue
- Stagnant buildup in low-flow areas
Gray tank odors are often caused by layered grease film, soap residue, and drain-line buildup — not simply “dirty water.”
Common RV Tank “Deep Cleaning” Methods That Aren’t Actually Deep Cleaning
These methods can be useful — but they are often mistaken for true deep cleaning.
Most DIY methods help move loose debris. True deep cleaning removes the hidden buildup attached to holding tank surfaces.
Running Clear Does NOT Always Mean Clean
One of the most common RV holding tank misconceptions is assuming a tank is clean simply because the rinse water appears clear.
In reality, hidden buildup can remain stuck to tank walls, sensors, corners, and low-flow areas long after tanks appear “flushed.”
This real-world example shows why odor problems, sensor issues, and recurring tank performance problems can continue even after repeated rinsing and dumping.
Need a True Holding Tank Deep Cleaner?
Happy Campers Extreme Cleaner is designed specifically for corrective deep cleaning when odors, buildup, clogs, or dirty sensors show your tank needs more than routine maintenance.
Learn About Extreme Cleaner →Tank Treatments and Tank Cleaners Do Different Jobs
RV Holding Tank Treatments
- Used regularly for maintenance
- Help control odors
- Help prevent future buildup
- Support ongoing tank performance
RV Holding Tank Cleaners
- Used when tanks are dirty or problematic
- Help loosen hidden buildup
- Deep clean tank surfaces and sensors
- Restore flow and performance
A treatment helps maintain a clean tank. A cleaner helps restore a dirty one.
One of the most common RV tank mistakes is using a maintenance treatment in a tank that already has hidden buildup, sludge, residue, or sensor contamination inside it.
Many RV owners assume their tank is clean because it has been flushed or rinsed regularly — but hidden buildup can still remain on tank walls and sensors over time.
If the tank itself is dirty, even the best treatment may struggle to control odors properly until the buildup is removed first.
How Extreme Cleaner Deep Cleans RV Holding Tanks
Extreme Cleaner targets the hidden buildup that rinsing, flushing, and backflushing can leave behind.
Why Gray Tank Buildup Is Different From Black Tank Buildup
Gray tanks often smell different from black tanks because the odor source is different. Kitchen and shower tanks commonly develop thin layers of grease, detergent residue, food particles, soap scum, and organic film that continue producing odor long after dumping.
Those layers can coat tank walls, drain plumbing, valves, and low-flow areas where ordinary rinsing cannot fully reach.
How to Rinse an RV Black Tank Properly
RV holding tank cleaners help loosen buildup, sludge, grease film, residue, and compacted waste — but the loosened material still needs to be flushed out of the tank.
That’s why rinsing is a critical part of the deep cleaning process.
Proper Rinsing Helps:
- Flush loosened buildup out of the tank
- Improve waste flow
- Reduce recurring odors
- Help restore sensor performance
- Prevent residue from settling again
Helpful Rinsing Methods:
- Built-in tank flush systems
- Backflushing after soaking
- Multiple rinse cycles
- Warm water rinses
- Driving to agitate loosened buildup
Deep cleaning works best when buildup is loosened first — then thoroughly rinsed and flushed from the holding tank system.
Don’t Forget RV Sink, Shower & Drain Line Cleaning
Many recurring gray tank odors actually originate in the drain plumbing above the tank — especially kitchen sink lines, shower drains, and P-traps where grease, soap film, toothpaste, food particles, and biofilm collect over time.
Common Drain-Line Odor Sources
- Kitchen sink grease buildup
- Shower soap scum
- Food particles trapped in plumbing
- Biofilm inside drain walls
- Dry or contaminated P-traps
- Low-flow stagnation areas
Helpful Deep Cleaning Tips
- Flush drains with warm water
- Allow cleaner to contact plumbing lines
- Use multiple rinse cycles
- Drive to agitate tank and plumbing
- Rinse after soaking
- Maintain treated water after cleaning
If gray tank smells return quickly after dumping, buildup may still be coating the drain plumbing and tank walls even if the tank appears empty.
Why Multiple Cleaning Cycles Often Work Better Than One Heavy Dose
Many dirty RV holding tanks clean in stages. The first cleaning cycle may loosen surface buildup and expose deeper sludge, residue, grease film, or compacted waste underneath.
While the Extreme Cleaner container is designed to clean one holding tank up to 40 gallons, many RV owners achieve excellent results by starting with a lighter cleaning cycle first — especially when the true condition of the tank is unknown.
Start With a Lighter Cleaning Cycle
For many holding tanks up to 40 gallons, starting with approximately 1/4 to 1/2 container is often enough for an effective initial cleaning cycle.
This approach allows the cleaner to begin loosening buildup while leaving additional product available for future rinse-and-repeat cleaning cycles if needed.
Heavily Neglected Tanks May Need Multiple Passes
Tanks with years of buildup, recurring odor problems, sensor fouling, sludge accumulation, or compaction often respond better to multiple cleaning cycles rather than using the entire container all at once.
Repeated cleaning, driving agitation, soaking, dumping, and rinsing cycles can gradually remove layers of buildup over time and restore tank performance more effectively.
Proper soak time, tank agitation while driving, thorough rinsing, and repeated cleaning cycles often matter more than simply adding more cleaner at once.
Why Mobile RVs Often Clean More Effectively Than Stationary RVs
Driving creates natural tank movement and agitation, helping the cleaning solution contact tank walls, corners, sensors, and buildup areas more effectively.
If You Can Drive the RV
- Allow the cleaner to soak
- Drive carefully to create agitation
- Help loosen residue and buildup
- Dump and rinse thoroughly afterward
If Your RV Is Stationary
- Use longer soak times
- Use additional rinse cycles
- Consider repeated cleaning cycles
- Severe buildup may require professional cleaning
Long-term stationary RVs with severe buildup or hardened waste may require professional hydro-jet or tank cleaning service before normal maintenance products can perform effectively again.
Backflushing Helps Clear Clogs — But It Is Not the Same as Deep Cleaning
Backflushing is extremely useful for dislodging clogs, improving flow, and helping move loosened debris out of the tank.
But by itself, it does not remove hidden buildup layers attached to tank walls and sensors.
The best results happen when buildup is loosened first — then rinsed and backflushed from the tank.
How to Clean RV Tank Sensors
Dirty sensors often happen when sludge, grease film, waste residue, or buildup coats the sensor probes.
Proper deep cleaning can help remove that conductive residue so sensors may work more accurately again.
False readings aren't always caused by buildup alone. Learn more in our complete RV tank sensor troubleshooting guide .
RV Tank Sensors Are Not Always Reliable Indicators of Tank Cleanliness
Deep cleaning can help restore dirty sensors — but RV holding tank sensors are notoriously imperfect systems.
How Dirty Tanks Affect Sensors
- Waste residue bridges sensor probes
- Grease and sludge create conductive film
- Buildup traps moisture around sensors
- False “full” readings become more common
Other Reasons Sensors Fail
- Corroded probes
- Loose or damaged wiring
- Grounding problems
- Faulty monitor panels
- Poor factory sensor placement
RV Tank Sensors: Why They Fail, Lie & Misread
Learn why false readings happen, why clean sensors can still misread, and how buildup, wiring, moisture, and tank design affect sensor accuracy.
Explore RV Tank Sensor Guide →What Real RV Holding Tank Deep Cleaning Results Look Like
Hidden buildup often remains inside tanks long after rinse water appears clear.
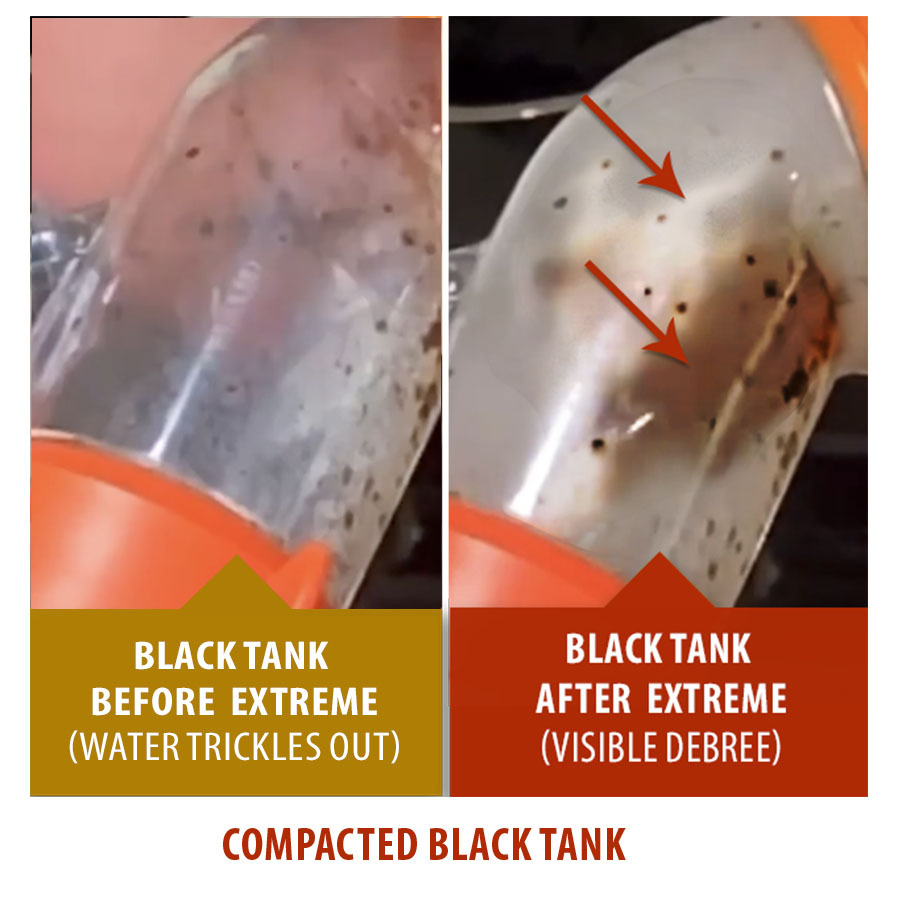
Compacted Waste Removal
Hidden buildup can remain even after repeated rinsing.

Gray Tank Cleaning
Grease film and sludge can collect inside gray tanks too.
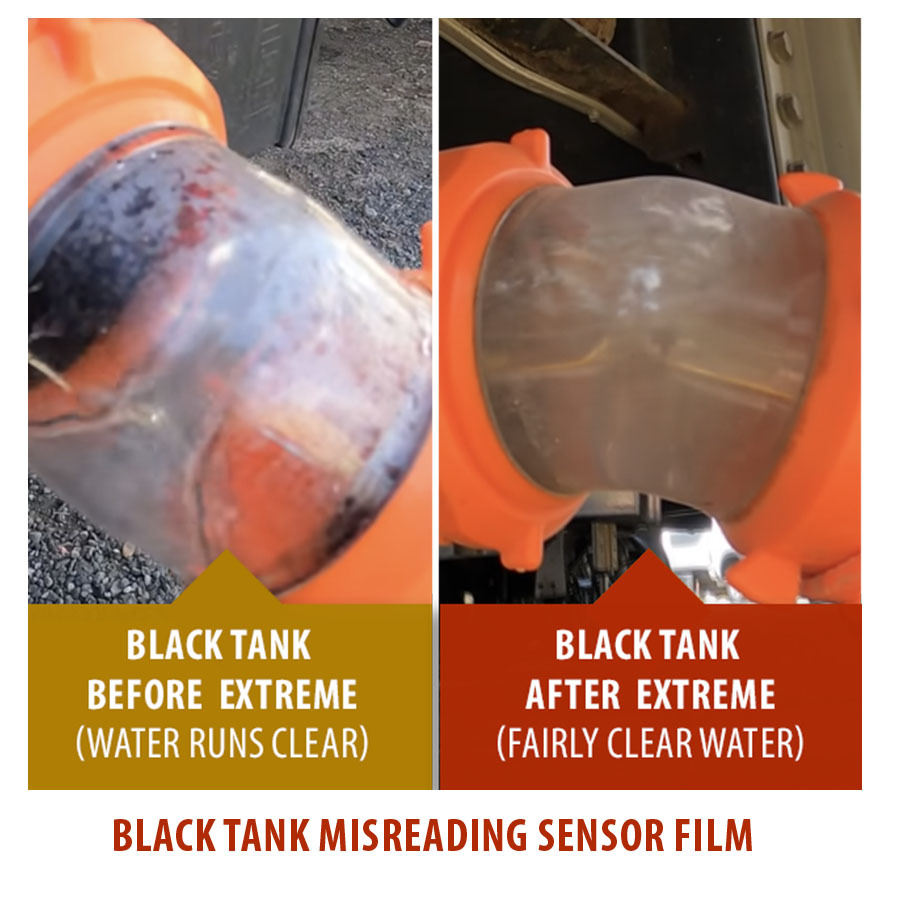
Sensor Cleaning
Dirty probes may need multiple rinse cycles to improve accuracy.
Ready to Deep Clean Your RV Holding Tanks the Right Way?
Extreme Cleaner helps loosen and remove hidden buildup, sludge, grease film, hardened waste, and odor-causing residue from black and gray tanks.
RV Holding Tank Cleaning Infographic
Save this visual guide for the next time your holding tanks need a true deep clean.

RV Holding Tank Cleaning FAQs
Does backflushing clean an RV tank?
Backflushing helps move loosened debris and clear soft clogs, but it is not the same as deep cleaning.
Why does my RV tank still smell after rinsing?
Rinsing may remove loose waste while hidden residue and buildup remain attached to tank surfaces.
How much Extreme Cleaner should I use?
Many tanks up to 40 gallons can often be cleaned effectively with 1/4 to 1/2 container per cycle.
Does driving help clean the tank?
Yes. Driving creates agitation that helps the cleaner contact tank walls, corners, and buildup more effectively.
Can gray tanks develop buildup too?
Yes. Gray tanks commonly develop grease film, soap residue, biofilm, and odor-causing buildup.